
Intro
Master 12-lead EKG placement in 6 easy steps. Learn the fundamentals of EKG interpretation and placement techniques for accurate readings. Discover the importance of lead placement, electrode positioning, and troubleshooting common errors. Improve your EKG skills with our comprehensive guide, covering lead placement, limb leads, and precordial leads.
The electrocardiogram (ECG or EKG) is a crucial diagnostic tool in the medical field, allowing healthcare professionals to assess the electrical activity of the heart. A 12-lead ECG provides a comprehensive view of the heart's electrical activity from multiple angles, making it an essential skill for medical professionals to master. In this article, we will break down the process of mastering EKG 12-lead placement in 6 easy steps.
The importance of accurate EKG placement cannot be overstated. Incorrect placement can lead to misinterpretation of the ECG tracing, potentially resulting in incorrect diagnoses and treatment plans. Moreover, mastering EKG 12-lead placement can enhance patient care, reduce the risk of complications, and improve overall patient outcomes. With practice and dedication, medical professionals can develop the skills necessary to accurately place EKG leads and interpret the resulting tracings.
In the following sections, we will delve into the specifics of EKG 12-lead placement, providing a step-by-step guide to help medical professionals master this essential skill.
Understanding the Basics of EKG 12-Lead Placement
Before we dive into the steps for mastering EKG 12-lead placement, it's essential to understand the basic principles of ECG interpretation. The 12-lead ECG consists of 12 different leads, each providing a unique view of the heart's electrical activity. The leads are divided into three categories: limb leads, precordial leads, and augmented leads.
Limb Leads
The limb leads (I, II, and III) record the electrical activity of the heart from the arms and legs. These leads provide a general overview of the heart's electrical activity and are used to diagnose conditions such as atrial fibrillation and ventricular tachycardia.
Precordial Leads
The precordial leads (V1-V6) record the electrical activity of the heart from the chest wall. These leads provide a more detailed view of the heart's electrical activity and are used to diagnose conditions such as myocardial infarction and cardiac arrhythmias.
Augmented Leads
The augmented leads (aVR, aVL, and aVF) record the electrical activity of the heart from the arms and legs, but with increased sensitivity. These leads provide a more detailed view of the heart's electrical activity and are used to diagnose conditions such as atrial fibrillation and ventricular tachycardia.
Step 1: Prepare the Patient

Before beginning the EKG, it's essential to prepare the patient properly. This includes:
- Ensuring the patient is comfortable and relaxed
- Removing any jewelry or clothing that may interfere with the EKG leads
- Cleaning and preparing the skin where the leads will be placed
- Ensuring the patient is in a supine position (lying on their back)
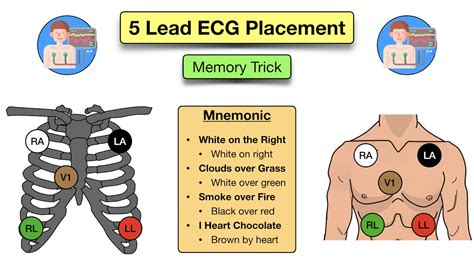
Step 2: Place the Limb Leads
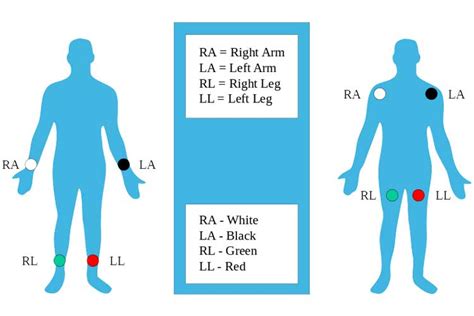
The limb leads (I, II, and III) are placed on the arms and legs as follows:
- Lead I: placed on the left arm, just above the wrist
- Lead II: placed on the right leg, just above the ankle
- Lead III: placed on the left leg, just above the ankle
Step 3: Place the Precordial Leads
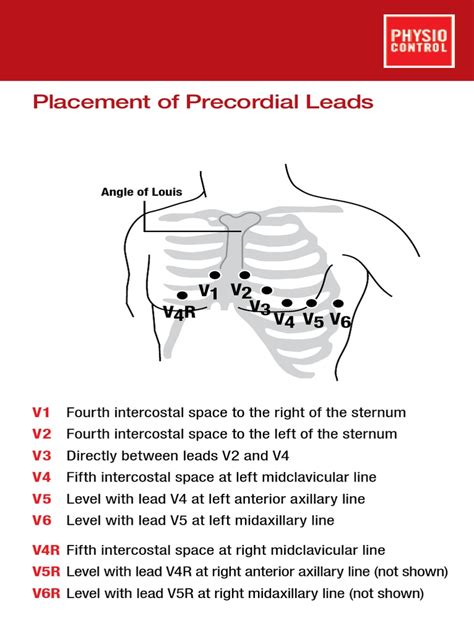
The precordial leads (V1-V6) are placed on the chest wall as follows:
- V1: placed on the right side of the chest, in the fourth intercostal space
- V2: placed on the left side of the chest, in the fourth intercostal space
- V3: placed on the left side of the chest, in the fifth intercostal space
- V4: placed on the left side of the chest, in the sixth intercostal space
- V5: placed on the left side of the chest, in the seventh intercostal space
- V6: placed on the left side of the chest, in the eighth intercostal space
Step 4: Place the Augmented Leads

The augmented leads (aVR, aVL, and aVF) are placed on the arms and legs as follows:
- aVR: placed on the right arm, just above the wrist
- aVL: placed on the left arm, just above the wrist
- aVF: placed on the left leg, just above the ankle
Step 5: Connect the Leads and Begin the EKG
Once all the leads are in place, connect them to the EKG machine and begin the recording process. Ensure the patient remains still and relaxed during the recording process.
Step 6: Interpret the EKG Tracing

After the EKG recording is complete, interpret the tracing to diagnose any underlying cardiac conditions. Ensure to analyze the tracing systematically, looking for any abnormalities in the P wave, QRS complex, and T wave.
In conclusion, mastering EKG 12-lead placement is a crucial skill for medical professionals. By following these 6 easy steps, medical professionals can accurately place EKG leads and interpret the resulting tracings, ultimately enhancing patient care and improving patient outcomes.
What is the purpose of a 12-lead EKG?
+A 12-lead EKG provides a comprehensive view of the heart's electrical activity from multiple angles, allowing healthcare professionals to diagnose and monitor various cardiac conditions.
What are the three categories of EKG leads?
+The three categories of EKG leads are limb leads, precordial leads, and augmented leads.
What is the correct placement of the limb leads?
+The limb leads (I, II, and III) are placed on the arms and legs as follows: Lead I: left arm, just above the wrist; Lead II: right leg, just above the ankle; Lead III: left leg, just above the ankle.